Sunday, August 16, 2020

This Is The End....A New Beginning

Following the controller Fire, the Fiero has been sitting in the driveway for five years just collecting dust. The batteries had been removed and sold and the warp9 motor taken out of the car. I had achived my goal of taking a car to the EVVCON event in Cape Girardeau, MO and when the controller fire destroyed all of the electrical components in the engine compartment, my passion for the project was destroyed along with it. 

The time had come to send the Fiero to a new beginning. I posted the car for sale on Facebook Marketplace and after many inquires, received one from a gentlemen who was serious about purchasing the car and had a desire to restore it to electric drive. My original plans were to clean up the motor and sell it separate but the potential buyer asked how much I was asking for the motor and after some thought, told him I would throw it in for the asking price. The gentlemen agreed and and the Fiero was headed to a new home. 

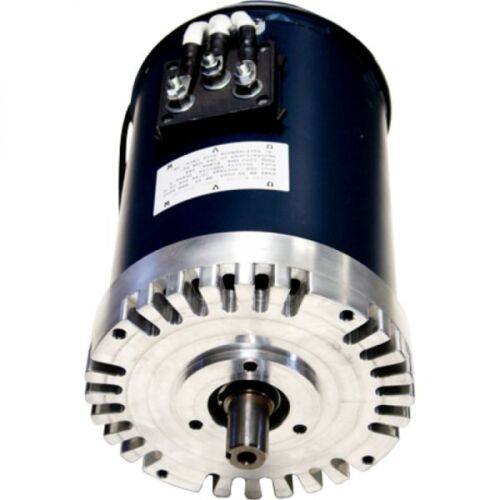
 When the motor was originally removed from the car, it appeared to be locked up but after it was removed from my shed and the remaining brushes were removed, the motor spun as free as a bird and there were no sounds of any bearing damage. Actually the commutator looked good and after a little cleaning up with a brush and some contact cleaner, cleaned up very nicely. I believe the buyer is going to be very satisfied with his purchase. 

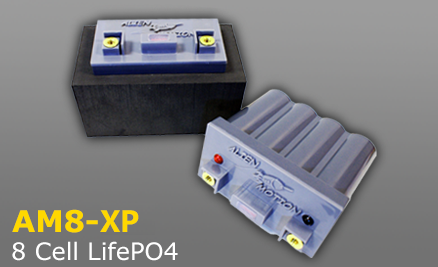
 When the buyer arrived I want over all of the electrical components and the digital meters in the instrument cluster. Also showed him the J1772 plug and controller for charging at a commercial charging station. The car was hooked up to the winch and loaded on the trailer for the trip to it's new home. The Fiero provided me with very much enjoyment and sense of accomplishment but for now this is the end....and a new beginning for the Electric Fiero. 

 Thanks for following my blog over the years! 

 Randy


Sunday, June 14, 2020

Webb Motor Works

This is a cool way to convert you hotrod that would give it a nice original look.


Sunday, August 13, 2017

NETGAIN HYPER9 AC MOTOR

I have had the Better Place batteries on Craigslist for over a year with plenty of interest but no takers, so instead of selling the Fiero EV project, have been looking for a suitable AC motor replacement. While checking out Facebook, this new motor came up from Netgain.


NetGain HyPer9 AC Motor


Specifications:

Motor Face: B-Face (Warp Compatible)
Motor Diameter: 9.0 Inches
Motor Case Length: 13.75 Inches
Motor Shaft Length: 2.0 Inches
Motor Shaft to End Length: 15.75 Inches
Motor Type: Permanent Magnet Synchronous Reluctance AC
Weight: 90 lbs 
Max Voltage Input: 132
Terminal Stud Size: M8 Inch
Integrated Sensors: Encoder and Temperature
Rated Torque: 173 Lb Ft
Rated Power: 120 HP
Max RPM: 8,000
RPM Sensor: Yes
Drive End Shaft: 1-1/8 Inch with 1/4 Inch Keyway
Accessory End Shaft: Not Available (coming soon)
Max Efficiency: 0.94
Thermal Cooling: External Heatsink
Max Temperature: 150 Degrees Celsius


What draws me to this motor is the Low Voltage, HP, Torque, efficiency, and the fact that it is a direct bolt-in to the currently installed Warp9 motor. It is not available until November, but EV West has installed the motor in a conversion and has offered a test drive before purchasing the motor package. Also, George Hampstra has been very supportive of the EV conversion industry over the years and always had gifts for the attendees at EVCCON, along with drawings for motors and merchandise during the show, so I really want to support him! I always felt like the last couple of EVCCONs without George were just not the same.

Undoubtedly, I will have to spend more to get the Fiero back on the road than buying a used OEM EV but something about converting an older classic car is more appealing than driving a newer offering by an OEM.

Stay tuned!

Randy

Sunday, April 2, 2017

FORK IN THE ROAD

The Fiero EV project has been a great experience filled with ups and downs over the last 5 years. My dream was always to take a build to EVCCON and that dream came true in 2015, although the event was actually canceled and only a scaled down version was held. 

My original thoughts were to purchase a lead acid conversion and just add the lithium batteries but that path went to the wayside when the original Curtis controller blew up, just as I was ready to start working on the Fiero.

Now I am faced with a fork in the road as after the Synkromotive controller caught on fire, I am really back to square 1! One lesson learned was that you do not want to do a build with old technology. When the Fiero was purchased, most conversions used DC motors and the HPEVS three phase motors were just being introduced. Prior that the introduction of this motor, AC motors and controllers were a very costly proposition. Now with the HPEVS motors and re-purposing of OEM motors, companies like EVNETICS and Synkromotive have ceased producing DC controllers for EVs.  


FORK IN THE ROAD

EVTV is offering a Siemens motor and air cooled DEMOC controller for around $1500, but just as the original purchase of the Fiero, this is old technology and is quickly being replaced by much lighter and more efficient motors and controllers. The Siemens motor is 190 lbs and the DEMOC controller is 60 lbs. That would be an increase of almost 120 lbs over the DC set up currently in the car using basically obsolete components.


AIR COOLED DEMOC


SIEMENS MOTOR

Couple this with the fact that used OEM EVs depreciate rapidly and are being resold at a fraction of their original price leaves one with the decision of whether to convert or pick up used OEM EV that still has a battery and drivetrain warranty. Currently a Fiat 500 E can be purchased on ebay for between $5000 and $6000. Decisions.....decisions!


FIAT 500 E

Between better motor/controller efficiency and lighter, more powerful, and safer battery technologies, does it really make sense to put the Fiero back on the road with the currently available components. Also, I am more of a mechanic and do not do well with the programming portion of the currently available OEM component technology, so struggle even pulling up a terminal session to set the parameters.  

With all of that said, the Fiero EV was still a fun and functional car to drive and with the 2 Better Place modules that were installed, had a good 50 mile range when driven moderately. So the question becomes, do I sell the car with the battery module for a little over the cost of the battery modules or dive back in and get it back on the road?


THE FIERO EV

If any of you have any input, I would be glad to hear from you.

Until next time,

Randy

Sunday, October 30, 2016

DECISIONS, DECISIONS

I must admit, the controller fire has knocked some of the wind out of my sails on the Electric Fiero Project. The panel meters were finally working and the plan was to install the third module before the Drive Electric Day at Easton Town Center in Columbus, OH. 

Currently the Better Place battery modules are listed on Craig's List and I am considering several options to power the Fiero. 

 1


The Warp 9 needs a major rebuild and honestly, I was never quite satisfied with a DC motor that did not have any regen capabilities, so am strongly considering the HPEVS AC51 and Curtis 1239-8501 controller. The motor would be a direct bolt-on replacement and it's shorter dimension would allow for easier installation into the motor cradle. Also the efficiency would go from the 78% of the Warp 9 to 88% for the AC motor.

Electric-Car-AC-Motor-Controller-Combo-HPEVS-AC51-Curtis-144-Volt-Kit-EV-West

HPEVS AC 51

If the Better Place modules do not sell for a profit, I will keep them but if I can make a reasonable profit, will sell them and go with CALB LiFePo4 batteries.  This would allow me to get more cells in the back of the car and be able to arrange them so the cradle could be dropped without removing the batteries first. 

Hopefully work on reassembling the Fiero can begin this spring.


Sunday, September 4, 2016

BATTERY REMOVAL

Last night I finally had the time to jack up the Fiero and remove all of the fasteners holding the battery module to the rack and even got four of them out of the car. To my surprise, all of the modules that were removed were still at 8.06-8.08 volts. 


FIERO ON JACK STANDS


FIRST 8 CELLS REMOVED


FIRST 4 CELLS REMOVED


VOLTAGE AT 8.06 VOLTS

The voltage reading was actually higher than expected as they were originally charged to this level but the car had been driven for 6 miles then went through a short period high current draw when the controller blew. The car was trying to move against the parking brake and then the brakes when I applied them so the amp draw must have been over 700 amps for a couple of seconds. Also puzzling, was that the fuse did not blow but it still has continuity.

All of the cells have been removed and the rack rinsed off, so the next step will be to remove the cradle.

When the new motor is mounted, adjustable coil over struts, new transmission mounts, and cradle modifications will be made to that the ride height can be adjusted, and the battery modules can be mounted lower. Also the transaxle is going to a transmission shop to be gone over and a new shift cable will be installed.

Also, a new AC motor and controller is going to be purchased and am trying to calculate the most cost effective way to go. This will take into consideration the cost of the components and the efficiency of the set up. The AC 50 or 51 would be the easiest to install and probably the least expensive but upon looking at the specs, is only around 88% efficient. I would think there are setups in the low to mid 90% efficiency available now.

More to come!

Tuesday, August 30, 2016

ALIEN MOTION BATTERY SALE


AM8-XP 8 Cell LiFePO4 Battery
AM8-01

MSRP $134.99 *SALE* $119.99

FREE DOMESTIC SHIPPING (Email for Intl Rates)
Select Polarity:
 
MODELAM8-XP
Length60mm - 2.36in
Width114mm - 4.5in
Height100mm - 4in
Weight820g - 1Lb 13oz
Capacity5 Amp Hours
Amperage Output<3 pulse="" sec=""> - 375 Amps
Max Charge Voltage & Current14.4V / 10 Amp Hours
ConnectionBrass Terminals with 6mm x 10mm Threaded
EnclosureImpact Resistant ABS Plastic Case
MountingAM Pod™ Enlarges Battery to 150mm L x 85mm D x 100mm H
PolarityPositive Left or Right

Product Details

The Alien Motion AM8-XP is a favorite among our customers. We found a sweet spot between size, weight, cost, and starting power. Well suited for engines up to 1200cc 4 cylinder, 1000cc twins and personal watercraft, the AM8-XP is a serious workhorse. Its 60mm depth allows it to fit in spaces too small for most lead acid batteries, while weighing under 2 lbs. Guaranteed to provide better performance and provide several times the lifetime of the original battery with proper use and maintenance.
Our all new XP series offers greater starting power and capacity with no more weight!.
Great battery for applications that require less weight and have limited space.
  • Ultra-Lightweight and High Power Lithium Motorsport Battery
  • Holds a charge with minimal drain for years when there is no draw on power
  • 2-Year Warranty and Out of This World Support
  • Great for everyday use for bikes up to 1200cc 4 cylinder, 1000cc twins and personal watercraft
  • Works with the original charging system
  • Great for racing applications
  • Significant cost savings and longevity compared to lead acid
V-Twin engines over 1000cc and cold weather usage should utilize the Alien Motion AM12-XP. for ultimate cranking power.

Saturday, August 13, 2016

REMOVING MORE COMPONENTS

This morning  work continued on removing components in the Fiero. The DC-DC converter, shunt and insulators for the shunt were removed, followed by the contactor that was used to shut off power to the charger. The only thing left before dropping the motor cradle is to jack up the car and get a couple of bolts removed that tie the battery end plate to the angle iron battery racks. Then I will be able to remove the battery module. I want to assemble the module out in the driveway and do a discharge down to 90 volts and then charge back up to 136 volts. I will probably do this a couple of times out in the driveway to make sure the module is not damaged so that if it does fail, it will be away from the garage.

I have not decided what motor/controller arrangement I want to go with but will either need to keep the voltage at 120 Volts or 360 volts. Not sure if the HPEVS motors go up to 360 volts so may have to stick with the 120 volt or consider another motor/controller arrangement.

The lessons learned from the controller fire are:


  1. Never assume that because the accelerator is not being depressed that the controller cannot send power to the motor. I had started to exit the car to check the status of the LED lights on the controller and had left power on to the controller. Fortunately the parking brake was on and the car was in 4th gear, so had enough time to jump back into the car and keep it from going into the field on the other side of the road.
  2. There needs to be an emergency cutoff switch inside the car and you need to practice using it so anytime there is a problem, it is a natural maneuver to  use it. After turning the car to avoid the field, after pulling on the emergency and standing on the brakes with no slowing effect, turned the ignition completely off. This did cut power to the controller but also because in the excitement turned the ignition on to the lock position, locked the steering and shut off the vacuum pump for the brakes. Fortunately the wheel was turned enough to miss the car stopped at the stop sign but only luck kept me from rear ending him.
  3. You should carry at a minimum a Class C fire extinguisher in the car for electrical fires. Had I had one the Fire Department and Sheriff would not have had to been called. If the batteries catch fire, you are probably not going to be able to have a fire extinguisher big enough to do anything anyway.
  4. There should be an emblem or decal on the outside identifying the car as electric. I was not injured in the event, so was able to tell the fire department that the car was electric. One of their questions after the fire was extinguished was how could we tell the car is electric if you were unconscious when we arrived at the scene?
I am sure the Warp 9 is going to take a major overhaul, with at least a communicator machining, new brush holders and brushes for it to be used again. Also, before installing a new motor, the transaxle is going to have to be gone over, as it does not shift correctly. Also one of the seals in the axle is leaking and has play when shaken, so believe the bearing is going bad. Additionally, new shift cables need to be installed as the fire melted the ends and the fire extinguisher residue caused corrosion on the metal rods that go inside the sheathing. 

May be awhile before this puppy hit the road again, so canceled the insurance for now. 

Sunday, July 31, 2016

UNCOVERING THE CARNAGE

After the wrecker dropped off the car I turned the ignition switch to the run position and remarkably, the JLD404 was reading 128 volts on the battery modules. This was a relief, as I was really worried about the module getting damaged.


AFTERMATH OF FIRE


BURNT UP CONTROLLER


FIRE EXTINGUISHER RESIDUE

On Monday, the front battery module was disconnected from the cables going to the rear module. The rear module was then disconnected and since the fire had left blackening on the aluminum battery cell housings, I was a little worried about voltage tracking to ground, so took some of the connectors off of the module so the voltage would be lower if it was tracking. By Wednesday, the controller was removed and much of the burnt wire and loom was cut and removed. The engine compartment was a sooty mess, so I mixed up some detergent with water in a spray bottle and tried to remove it from the engine compartment. Then on Saturday, the charger, charger bracket, and motor base were removed from the car. I was still getting quite dirty from soot so went to AutoZone and purchased some engine de-greaser and Brake cleaner. The engine compartment was soaked with the de-greaser and the top of the battery module was sprayed down with the brake cleaner, scrubbed down with a brush, and wiped down with a rag to try to remove as much soot as possible. The soot on the aluminum sides was also cleaned and scrubbed with a brush and wiped down. Then the sides of the engine compartment was hosed down to wash off the de-greaser. It is much better but I still get a little soon on me when working. The contactor and emergency shut off switch was then removed along with the base it was mounted on.

On Sunday the motor brush cage was removed and there was quite a mess from the fire extinguisher that looked like it was corroding the communicator and brush wires. The communicator was sprayed down with brake cleaner and wiped out as much as possible. Then the top brush and connection post was removed from the motor. Not sure I can get to the remainder of the brushes but am hoping they can be removed without having to pull the motor. Even if they can be removed, I doubt the communicator will be able to be cleaned without removing the motor and the only way to remove the motor is to drop the entire cradle, so am going to need to remove the battery module. Basically, I am back to square one on the build and If the cradle is dropped and motor removed, will need to seriously consider going with an AC motor set up. Also if the motor cradle is dropped, I will probably purchase a new transaxle, as the one currently in the car has never shifted correctly.

I have been thinking about the lessons learned from the fire experience and will try to write about that in the next post.